I surf around on Pinterest when I am waiting or...
This is something I really need to try to spice up our boring cement slab yard/pool area!!!
(here is the original link to the pin)
So much FUN!!!
We can do this!!!

Showing posts with label diy. Show all posts
Showing posts with label diy. Show all posts
Sunday, October 13, 2013
Friday, October 4, 2013
Ask me questions about knitting/crochet/felting/dyeing fibers etc, I will answer them for FREE!!!
I have been asked many many times to share my knowledge about knitting/crochet/felting/dyeing fibers etc.
So here is my question to you:
Let me know what you like me to explain/clarify/simplify related to the above mentioned arts and crafts, by either sending me an email at info@beautifulyeah.com or leaving a comment below.
There are no secrets for me to hide. I will explain it to you or refer u to other online content or whatever it might take.
Even if you have a question about a project you are working on, send me the pattern/pics etc and I'm pretty sure I can help you out from here :)
I will work through all your questions one blog post at a time, promise!
So go ahead and ask!!! I'm waiting....
Sunday, June 30, 2013
Growing avocado trees from scratch
Avocados are delicious and very loved in our household so I was joking around with my hubby last night that I could grow it out of the 2 pits I used tonight for dinner :)
That said, I got the pits, glass of water, toothpicks out and prepared the pits for their long journey (few weeks/months) to becoming a yummy avocado tree.
I think the picture will show you enough detail of how it's done :)
I read I have to refresh the water every 2 days so hopefully I won't forget that ;)
To let you be part of this progress I will every day take a picture and post it. This blogging is so much fun :)
Finally here are the "pits in progress" :)
Friday, June 28, 2013
Pimp up my picture frames
The picture frames I found yesterday are in need of a makeover to fit my beach interior decorations :)
So this is how i found them before I tackled the 6 picture frames:
(The 6th one is larger so you will see it in the next pictures)
I want them look weathered with some color coming through, you will see what I mean...
I used Gesso (white) since I have a big bottle of it, to set kind of a base to cover the brown of the wood.
(Instead of gesso you can use any acrylic paint in whatever color you fancy of course)
One coat done:
No I have to let it dry and apply a second coat of gesso.
Here is my setup on the dining room table:
This second coat needs to really dry so we all have to wait...:)
I will show you the next stages as I get there of course!
Thursday, June 27, 2013
Your Trash could be my Treasure Day
So as my previous post told you I rescued two plants today from the trash :D
As I blogged and talked about this little adventure on Facebook, I had no idea that I would be ending up, getting my arm twisted to go "alley" trash shopping again...
We have sooooo many alleys in this area so I was only able, in 85F, to cover 4 alleys on my treasure hunt.
Well off I went, really 2 steps in the alley behind our house I found 6 picture frames and a "wreath" plastic container box...SCORE. And easy cos I could just turn around and leave it in our garage.
One alley over I found a big(ger) picture frame (no glass though) but some dunes/ocean pic (B&W) in it. Fine, mine!
Walking in the alley, made me giggle especially when I decided why not take all the empty bottles too. I go to the recycle center every 2-3 months anyway, it's cash money baby!! Well, picked up two big garbage bags of empty bottles up while treasure hunting in the alleys :D
I saw a lot of furniture, desks, tables, chairs etc...just needed a facelift.
Oh and all the things you can do with clothing, but that's for next time :D
So guess what I will be doing soon...YES!!! I will start refinishing the frames and use them!!
What a fun day!!! And it was so much fun interacting with everyone on my Treasure Hunt!!!
Thank you for participating!!!
See you tomorrow :)
Plant rescue mission - from trash to pretty
On my daily morning walk I notice, while crossing the alley, that someone threw out 2 perfectly nice house plants in some old wasted basket.
I hate seeing things go to waste and I love plants so you guessed it :)
Perfectly goes within my budget too (don't laugh...ah well...laugh!!!) FREE!!!
Immediately after I dropped off the puppy at home, I walked back and took the 2 plants.
I forgot to take picture of both ;)
Here is a pot I still had in the garage, with some soil too
Thrifty and free!!!
Here they are ready to go on my dining room table :)
Gotta look up what kind of plants they are though...do you know?
Wednesday, June 26, 2013
Another sewing project finished :)
I totally forgot to share with you the sewing project I finished yesterday.
Part of the reason was that they were used immediately :)
That's a good sign though...
Look in my Etsy Shop (the link is at the left top above the header "my Etsy Shop") for more of my creative sewing projects since that's the way I support my blog and projects here...thank you :)
Or click here: www.etsy.com/shop/calicreative
First pillow case (the big one), I finished a few weeks ago already.
The smaller ones I finished yesterday :)
Sorry for the dark picture...:(
Saturday, April 20, 2013
Tuesday, April 9, 2013
Deal of the DAY!!!
TODAY ONLY:
FOR SALE:
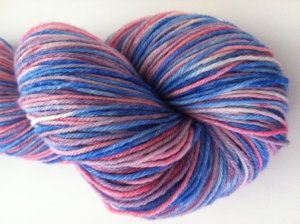
1 skein of Hand Dyed Sock yarn "Summer Bliss"
70% Merino Wool 30% Silk
440 yards / 100 grams
7-8 st = 1" on US1-3 needles
Handwash cold
Price: $22 free shipping USA
Price: $22 free shipping USA
ONLY 1 LEFT!!!
Tuesday, March 26, 2013
Some updates...
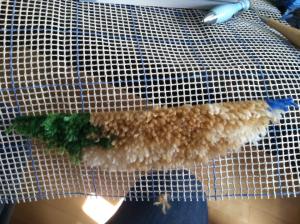
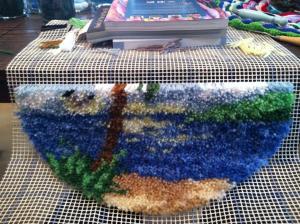
I have been very busy lately, lot of custom orders, new kitty in our family and lots more so I am just going to give you a photo stream of the latch hook projects I have been working on or I am still working on...
Latch hook projects:
Round Palm Beach (finished):
Still working on the Sailors Beacon:
Wednesday, January 23, 2013
My new design wall / memo board :)
My new design wall :)
Cheap, no tools involved just Velcro Command (3M) picture hanging strips and the foam puzzle tiles that I got dirt cheap at Walmart.
I use those tiles to to block my crochet/knitting items :)
Cheap, no tools involved just Velcro Command (3M) picture hanging strips and the foam puzzle tiles that I got dirt cheap at Walmart.
I use those tiles to to block my crochet/knitting items :)
Sunday, January 6, 2013
Pattern for CAL January is up on Ravelry and Craftsy!!!
The patterns I write are mainly to cover the cost of my blogs/time/materials/coffee and I really enjoy receiving your feedback.
I am always here to help if something is unclear because I am still human and I do make mistakes :)
Here it is my new pattern!!!
Year long CAL (Crochet Along) blanket starting next month
We are starting in February 2012 on this blanket as a year Crochet Along.
You can sign up, follow and interact with all the participants in our Ravelry Group.
or you can find her pattern on this website for FREE: http://www.liveinternet.ru/users/olga_lana/post204121601/
Thursday, January 3, 2013
FB group for Crochet/Knit and Sew Alongs
Someone whispered in my ear that it takes a lot of work out of my hands if I just set up a FB group for my Crochet/Knit and Sew Alongs, so they can post/interact with others.
Everyone can share their creations from our monthly CAL/KAL/SAL's!!!
Make sure you add yourself to my FB group, just click on the link below!!!
Wednesday, January 2, 2013
Crochet Alongs / CAL's for January and February 2013
Here are the Crochet Along projects for the next 2 months.
January 2013:
"Pimped up storage Jars"
Pattern will be up by the end of the week...sorry I got a little behind :)
February 2013:
This is the original picture that goes with the pattern:
And here I made the scarf in about 3 hours of 3 balls of yarn (Red Heart Boutique Midnight & Treasure - Whisper & Spectrum), Medium weight (4) worsted weight yarn on a hook size: US F -3.75mm.
Really easy fun free pattern to remember (just one line).
I went for texture in this scarf. If I wanted more stitch definition I would have probably used a bigger size hook and a solid color (see green scarf).
Yes, one side of the scarf will be straight and the other side will be scalloped...it doesn't bother me but it might to some of you.
Hope you join with these Crochet Alongs and send me pictures/ or
post your pictures in my Ravelry Group.
Friday, December 28, 2012
Start of the Poppies Wall hanging!!!
Finally, I got some important things that needed to be done squared away today and I still had some hours left in the day to work on my Poppies Wall hanging :)
But first I need to tell you that this chalk tool is AMAZING!!! See it has a little wheel on which the chalk falls out to draw a line.
I still had it in my sewing box and I refilled it with chalk.
So easy and I don't remember the brand so I took two close up pics for you, in case you want to look for it.
I couldn't find my rotary cutter nor could I find my quilting ruler so I had to cut all the pieces needed for my wall hanger with scissors and measure with my yard stick.
It took a little longer but it works.
Remember this is the wall hanger I am making.
I set up my ironing board after I finished cutting since I will be needing it while assembling the wall hanging.
Love my iron too, only $30 and it has a safety automatic turn off after 30 seconds!!
I rarely fill my water reservoir in my iron cos I use a spray bottle. It keeps my iron from getting calcium build up everywhere.
Can you see the gold sparkle fabric I found dirt cheap ($2/yd), love it!!
2 hours later the front frame part is assembled :)
It's looking good!!!
Hopefully tomorrow I will have some time again to work on it!
Thursday, December 27, 2012
January 2013 - Crochet Along (CAL)
I need to "pimp up" my work/design space and of course I want it to look cute but functional too so here is the Crochet Along for January 2013.
You can join in or just watch as I will periodically post some of my creations.
Let me know if you want me to write up a crochet pattern.
I used mason jars, the ones with the bigger opening at the top so I can store my hooks in there or my knitting needles.
Cute gifts too or you can use them to save up your coins or...
Some left over cotton yarns and a took my box with ribbons out.
And here are the results:
with a ribbon and flower
And one with just a variegated yarn and ribbon.
I will be making some more that I will be posting here.
So grab your hooks and start spicing up your jars :)
Love to see pictures and feel free to ask questions!!!
Wednesday, December 26, 2012
Design Tutorial: Color (wheel)
Let's continue on explaining a little bit about "color"
This is what I use for designing: the color wheel.
I know some of you will say: "how do I use this color wheel?"
It's not that hard so let's start with basics by showing your the color wheel:
Here is an explanation of the color wheel I got from this website:
The COLOR WHEEL has 12 segments that consist of
primary, secondary and tertiary hues, or colors.
The three PRIMARY colors are RED, YELLOW, and
BLUE. They form a triangle on the wheel. These colors cannot be mixed by
combining any other colors. They are indicated on the color wheel with a P.
The three SECONDARY colors of ORANGE, VIOLET, and
GREEN (marked on the chart by an S)
are created by mixing equal parts of the primary colors they fall in between;
ie, VIOLET is the secondary color produced by mixing equal parts of RED and
BLUE.
The TERIARY colors are the colors that result
from mixing the primary and secondary colors on either side of them: ie, mixing
the secondary color ORANGE with the primary color RED results in red-orange.
These colors are marked on the color wheel with a T.
Using the color wheel you can determine color schemes fpr balance
and harmony in your artwork, webpages, desktop publishing designs or home
decorating.
Hue: Hue refers to the color...red, blue, etc.
The primary, secondary, and tertiary colors, or
hues, are these colors at their full saturation or brightness; that is, there,
there is no white, gray, or black added.
Value: the lightness or darkness of a color, or
the relative amount (percentage) of white or black in a hue.
Luminosity, or Lightness: A measure of the amount
of light reflected from a hue. Those hues with a high content of white have a
higher luminance, or value.
Tints: white when added in increments to any
color results in a lighter value of that color, called a tint.
Blue and white make light blue, which is a tint of Blue.
Shades: black or gray when added in increments to
any color results in a darker value of that color, called a
shade. Blue and Black make dark blue, a shade of blue.
Saturation: The degree of purity of a hue.
Intensity: The brightness or dullness of a hue.
Iintensity maybe lowered by adding white or black.
* * * * * * * *
Colors opposite of each other on the color wheel are COMPLEMENTARY colors, this means they work very well together (complement each other/balance).
Like red and green, blue and orange etc...
This is just a brief explanation about color and we can incooperate this into our "designs".
For example:
Red and green
I am trying to show you that this is just a tool to help you in designing...
You can also decide to use the rainbow colors, like my blog header of my own hand dyed yarns:
Or like I used the "rasta" colors in my design below:
There are so many ways that I won't be able to cover them all but know that working with the color wheel rules you design will look "balanced" and is "easy" on the eyes...
Be free, it's art so let those creative juices flow...
Have fun and feel free to ask questions!
Subscribe to:
Posts (Atom)


